
In a world advocating for AI, we advocate for humans
AI should enhance creativity, not replace it. StoryTribe empowers humans to create more, keeping art and storytelling in our hands.
Yunmie & Joe
StoryTribe Team
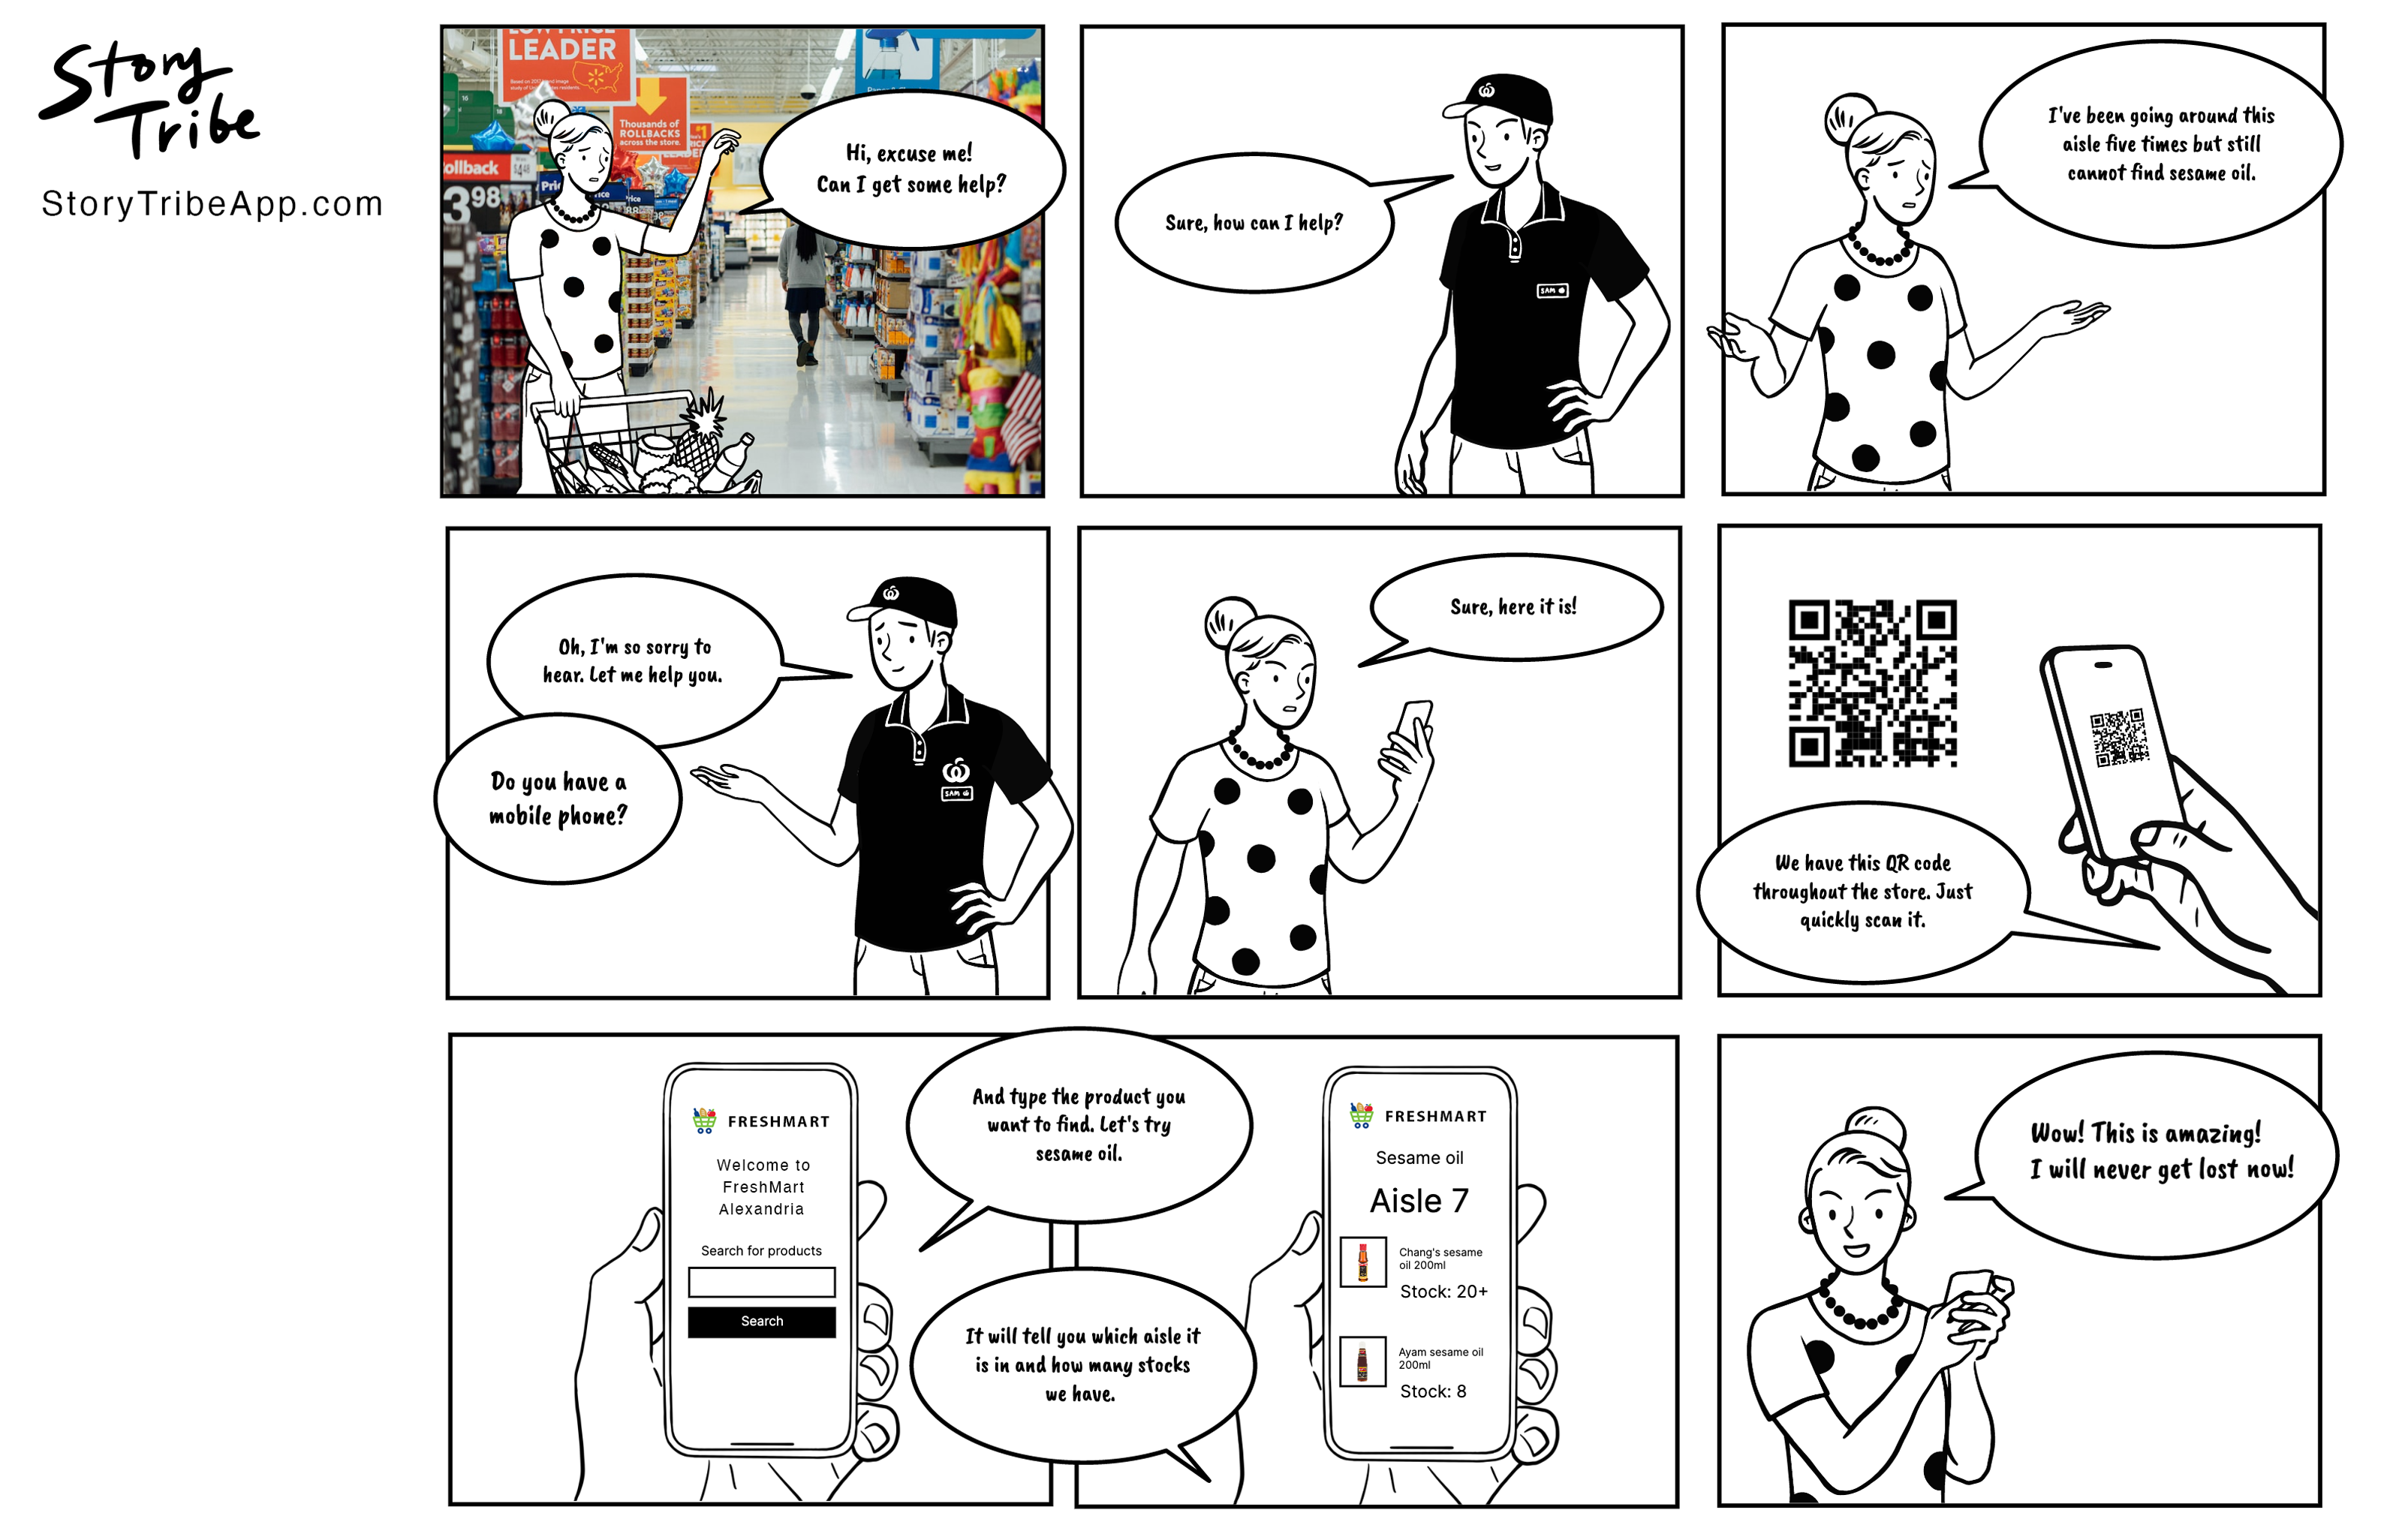
Discover how to use storyboards in UX design to visualise user journeys, enhance collaboration, and keep users at the heart of the process. This guide covers storyboarding for UX and its benefits for your design process.
A storyboard is a visual tool used to map out a narrative or concept in a series of frames, much like a comic strip. Originally developed in the film industry, storyboards help plan and communicate ideas effectively, by illustrating key moments with brief descriptions of actions or dialogue.
Storyboards play three key roles in UX design.
1. Help designers think through the user journey
By visually mapping out a user’s steps interacting with a product or service, designers can easily spot broken journeys or "plot holes" — gaps and obstacles in the user experience. Identifying these issues early on allows for refining the user journey, leading to a smoother, more effective design.
2. Serve as powerful communication tools
Since the brain processes visual information 600 times faster than text, using storyboards in presentations and team discussions boosts attention and engagement. This helps designers to communicate their ideas and vision in a quick, engaging, and memorable way.
3. Help creating empathy
In a storyboard, we follow the characters' stories and put ourselves into their narrative. By doing so, both the designer and stakeholders are encouraged to see the experience from the user's perspective. This is especially important for external stakeholders who weren’t involved in the creation of the UX, as it helps them empathise with users' situations and contexts, leading to a better understanding of the consequential design decisions.
In the UX design process, everything begins with researching users and defining the core problem that needs solving. Once that foundation is laid, designers begin brainstorming potential solutions, narrowing down the ideas to focus on one approach. With that solution in mind, the team then moves into design, prototyping, and validation before the product is fully developed and launched. After launch, ongoing UX testing helps refine and improve the product in response to user feedback.
That’s the typical flow of UX design. But where do storyboards fit in? Storyboards can be valuable tools at multiple stages of this process:
As-Is Journey
Storyboards can be used to map out the current or "as-is" user journey. This helps the team understand how users interact with the product as it exists today, highlighting pain points, inefficiencies, and areas that need improvement.
Research Playback (Both Pain Points and Success Stories)
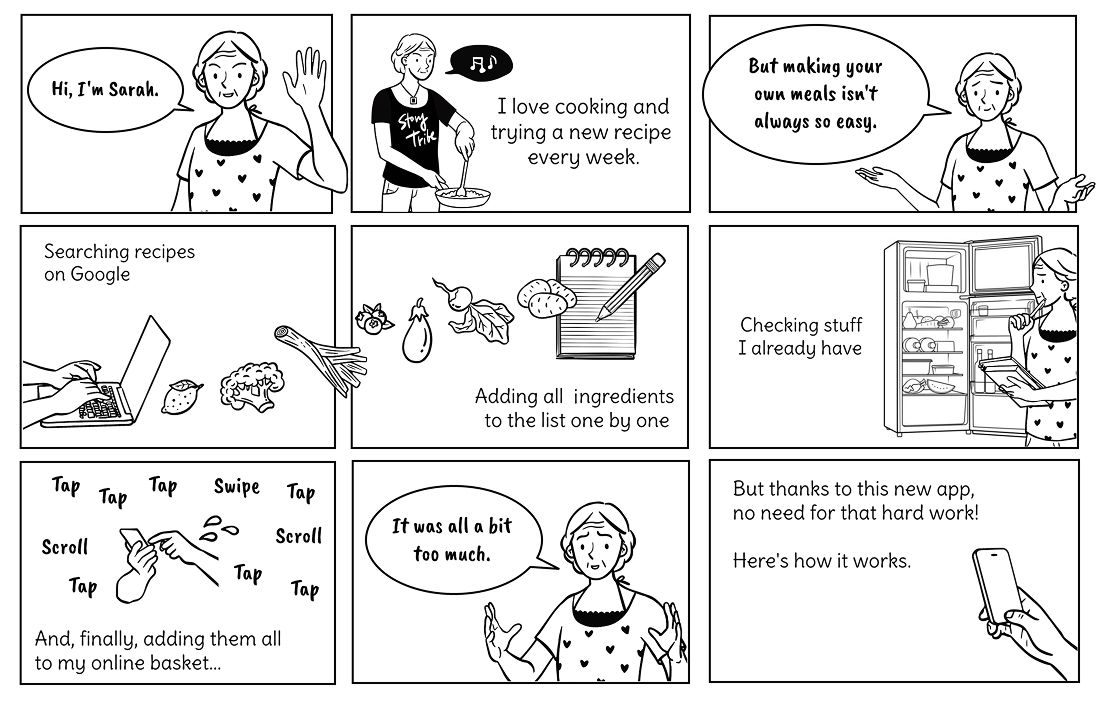
Storyboards are useful for illustrating research findings and usability test results. They visually explain how users interact with apps or websites and the challenges they face, making the information more engaging than text or data alone. After design iterations that address the problem, you can use storyboards to highlight moments of success, creating a clear contrast between the initial problems and the improved experience.
During Ideation
Once the core problems have been defined through research, storyboards play a critical role during the ideation phase. By visualising different potential solutions, designers can explore how users might interact with each idea. This allows the team to assess which solution best addresses user needs, as well as identify any obstacles early in the design process.
To-Be Journey (Also Known as ‘Vision-Type’)
After ideation and once the product team agrees on the future journey direction, storyboards can be used to create the "to-be" journey as a north star vision for the product. This shows how the ideal user experience should look, aligns the team and stakeholders on the desired outcome, and provides a clear vision for where the product is heading.
Throughout the Design Phase
Throughout the design and development process, storyboards serve as a valuable reference point. Whether highlighting user pain points or illustrating the product vision, they help ensure that design decisions align with user benefits and/or the team’s vision.
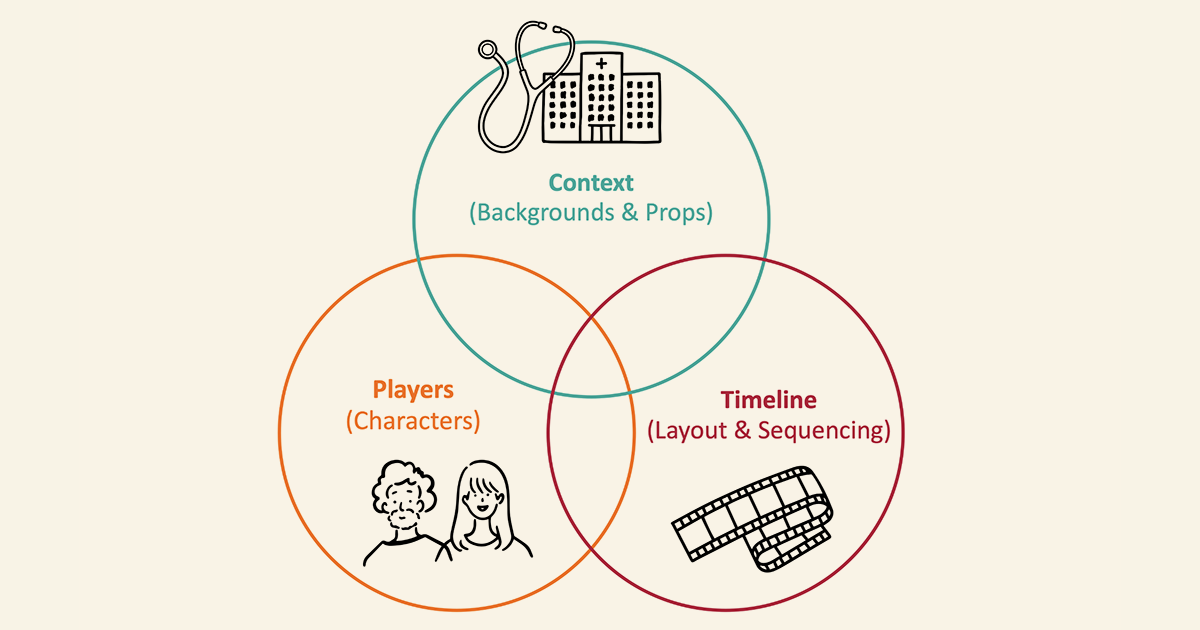
Every storyboard needs these key elements:
Players (Characters)
Characters form the backbone of any storyboard, representing the people or figures driving the narrative. In UX storyboards, the main characters are the users, expressing their thoughts and feelings throughout the story through dialogue or monologue.
Context (Text, Backgrounds, and Props)
Storytelling requires explaining the context. In storyboarding, this is achieved through text (scene descriptions), as well as background images and relevant props that set the scene. The context illustrates the environment in which the characters operate, highlighting external factors or constraints influencing the user experience. Whether it's a digital device, physical space, or other characters, these elements provide clarity to the user’s situation.
Timeline (Layout and Sequence)
Sequencing events across frames is key to creating a cohesive narrative. The timeline allows designers to map out interactions chronologically, showing how users move from one step to another within a product or service journey.
We’ve broken down the process into seven simple steps. Here’s how you can create a storyboard:
1. Define the purpose
Start by identifying the goal of your storyboard. Why are you making it, and what stage of the design process is it supporting? Whether it's to visualise user research, explore ideas, or test early concepts, knowing the purpose helps shape the scenario and persona you'll focus on.
2. Gather data and artefacts
Collect relevant information based on your storyboard’s goal. This could include user research data like survey responses or usability test results. If you’re working on ideation, user personas and high-level concept sketches might be useful.
3. Choose your tools
Decide on the tools you'll use. If it's a low-fidelity storyboard, grab pencils and paper. There are plenty of templates available online to help you get started. For digital storyboards, StoryTribe is an excellent tool for UX storyboarding.
4. Write an introductory statement for the user & scenario
Next, create a short, clear statement that defines the main character (the user), the situation, and the challenge she faces, setting the stage for the storyboard. The introductory statement should be straightforward so that anyone reading it can easily understand the focus of the storyboard.
5. Draft the story
Write out the steps of the story, detailing what actions the user takes and how they feel at each stage. Focus on one specific flow or sequence, and keep the story concise. If multiple actions lead to different outcomes, create separate storyboards.
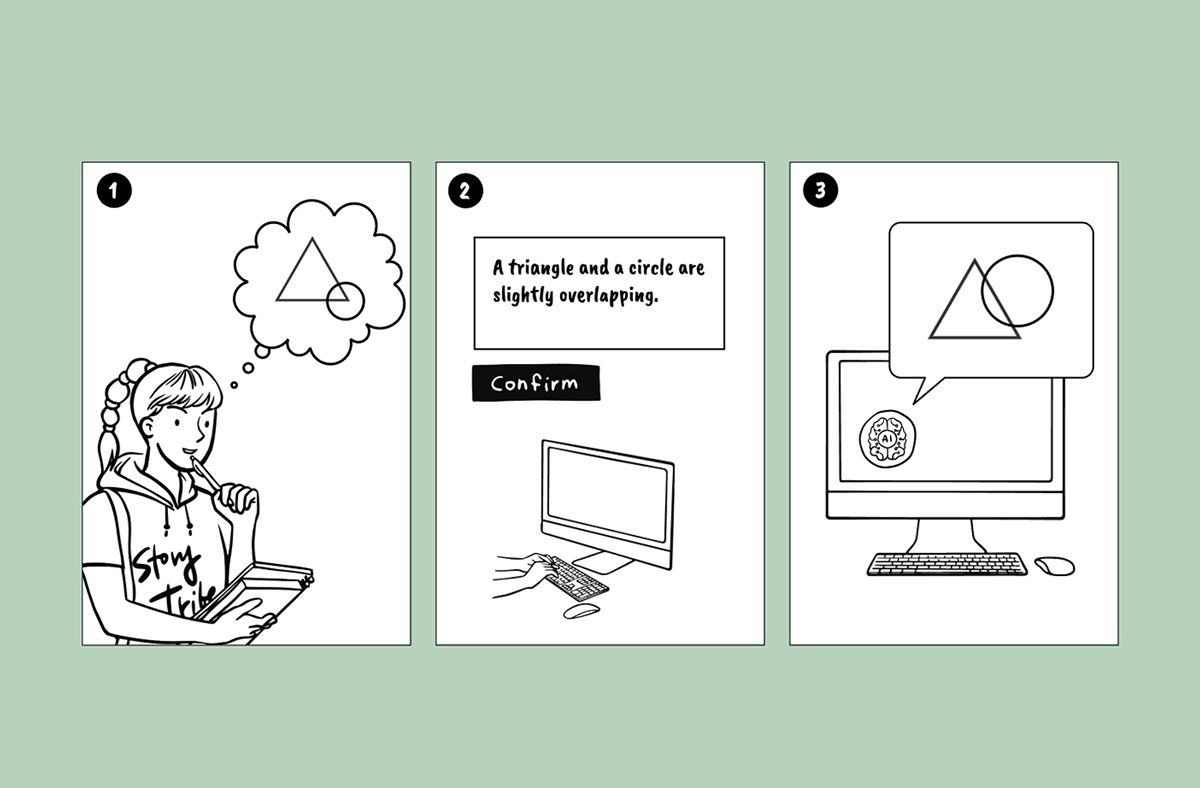
6. Add visuals and text
Now, turn your written steps into visuals. Sketch or insert images for each frame, and add a brief description to explain what’s happening and how the user feels. Tools like StoryTribe allow you to go beyond simple stick figures, offering a large library of props and backgrounds in a sketch style that are presentation-ready for professionals.
7. Present your storyboard
Once complete, use your storyboard to communicate ideas. Whether presenting it to stakeholders or inspiring design discussions, it’s a great tool to share insights visually and effectively.
1. Keep it simple
You don’t need to be an artist! Focus on the user’s journey and the emotions involved. Basic sketches are often enough to communicate key ideas.
2. Utilise online storyboard tools
Leverage tools like StoryTribeApp.com to streamline the process and ensure consistency across storyboards.
3. Include UI elements sparingly
When creating storyboards, include UI or screens only if they are crucial to understanding the user interaction. Storyboards should remain high-level, focusing on the user experience rather than interface specifics.
Storyboards are more than just sketches on paper. They serve as a bridge between data and design, humanising user experiences and fostering collaboration across teams. As UX designers, integrating storyboards into our workflow not only enriches the design process but also ensures that user needs stay front and centre.
Looking for help with drawing? Check out StoryTribe! You can tell your story on a canvas without drawing, for free! Begin transforming your user research into compelling visual narratives.
-> Start with our free storyboard maker
AI should enhance creativity, not replace it. StoryTribe empowers humans to create more, keeping art and storytelling in our hands.
Yunmie & Joe
StoryTribe Team

In a world where attention spans are shrinking and visuals dominate our screens, the right technique for visual communication has become more crucial. Here’s why StoryTribe aims to redefine how we share and understand ideas.
Yunmie Kim
Multimedia Specialist
In this blog, I'll talk about some common problems people experience when using AI to generate visual content, and how a different approach could solve these problems.
Yunmie Kim
Multimedia Specialist